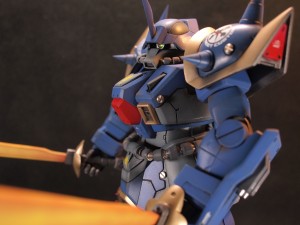
Weekend update on the kit. I spent a little more time this weekend just pumping the sucker out. I still have a good amount of work on the sucker such as all the detail painting, panel line wash, decals, and finishing the weapons. Speaking of the weapons, I wanted to create a realistic wood grain effect on the weapons, the Naginata, Musket, and JÅ«monji Yari. I made a few videos for the technique as well.
At the start of the weekend, I had the main armor pieces sponged with the marble technique that I used on the IJ kit. This time, I’m using Finisher’s Super Fine Cobalt blue over gloss black. Once this was dry, there were a few bubbles on the surface due to the rather thin paint I used. So the parts were hit with a 400 grit wet sanding session to smooth out the areas.
With parts of the Naginata, there were detail areas that had deep grooves that looked like gaps, so I decided to fill those using styrene squares. The blocks were cut to size, tamiya extra thin cement was dropped in, and the blocks glued into place. Once the glue cured, the excess was sanded and any left over gaps were fixed using tamiya light curing putty.
Wood Grain Tutorial
The parts are first painted in a neutral wood color. I used Mr Color Tan.
Once the base color has dried and cured, the first of two dry brushing sessions begins. Since the base paint is lacquer, I’m using acrylic paints which will not mix with the lacquer base. The paints used are vallejo light brown mixed with vallejo burnt sienna. The stuff dry brushing brush is used and the technique is identical to the dry brushing technique, except the brush is not run across the hard edges, but along the length of the part to allow for small thin streaks of paint to hit the surface. This is the first layer of the wood grain.
Below is the video for this process:
Get the Flash Player to see this player.
Below are pictures of the parts after this first dry brushing session.
Since the acrylic will dry fairly fast, it dries even faster since the amount of paint applied is a minimal. Once dry, a clear lacquer gloss is sprayed to seal in the acrylic layer. This is necessary as the next step is a second dry brushing session using the acrylics, and to keep the acrylics from affecting each other, a layer of gloss is sprayed for protection. Notice the darker tone after the gloss coating.
Once the gloss coat has dried and cured, the next step is the second dry brushing session. The difference in this step is the brush used and the paint color. Vallejo’s burnt sienna is used alone with a soft flat brush. The lines created in this step will not be as coarse or random. The same dry brushing technique is used, loading the brush with a small amount of paint and wiping off most of the paint before running the brush along the length of the parts. Below is a video of this process:
Get the Flash Player to see this player.
Below is a picture of the parts after the second dry brushing session. Once the acrylics have dried from this step, the final step is a slight dark tinting for the parts. A mixture of clear red, clear yellow, and clear green was made to create a clear brown. The clear brown is sprayed over the parts and this darkens the tone of the parts that finalizes the wood grain effect.
Back to the Musha. The marbled parts were treated to another marbling session using a very light blue, and sparingly sponged onto the surface. Once dry, this layer was also sanded to smooth out any rough spots and then treated to a heavy clear gloss coat.
The white parts for the kit was first based coated in an intermediate blue, then shaded using white. A coat of pearl white was then sprayed to give the parts a pearl finish that matches up with the metallics and shine of the marbled parts. Here are some additional pictures of the Musha. Again, a great deal more detail work is necessary before the kit can be called finished.


Looks awsome, diggin the marble and wood grain, keep up the good work
this one looks very complicated. i guess you got that skill
wow thats really impressive! you’re using some pretty advanced painting techniques there. very thorough. looking forward to the finished product.