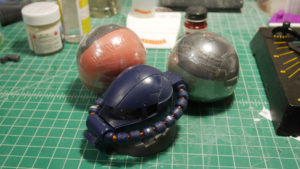
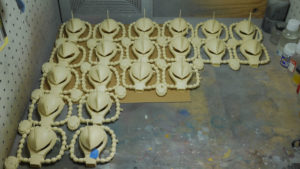
Work has me on travel a bit, and last week, I was in Ecuador, Guayaquil specifically. I did make a quick picture post of the skirts right after getting 90% of it painted up just as a quick teaser and to keep my motivation going. But I didn’t really go into details about the process. So let us backup a little bit to before I even started throwing colors onto the kit and it was still being primed and sanded. The paint scheme I mentally pictured required a little bit of testing before I jumped right into spraying the parts and masking. In the past, not doing the proper color tests and just trying things have bitten me pretty hard on the ass. I mixed up several batches of colors and got to work on spoon testing.
When I was in Hong Kong in March; I picked up some metal templates; a square and a hex. Each template has 4 sizes, the largest on one side, then the other side is split into three sizes. The template is pretty nice for cutting exact size squares or hexs. Tape is just placed on the template, then I used a toothpick to run along the edges to press down the tape, and finally, run a brand new hobby knife blade along the pressed in grooves and I have my cut squares. A test spoon is painted with the first layer of color then the masking and paint scheme tests begin.
Fast forward the different levels of masking and I was satisfied enough with the results that I could proceed. The spoon test also showed me that I needed to change the masking technique slightly. But the important part of color matching worked, so progress continues on the actual kit after the jump.
With the successful spoon test, I start spraying the base color for the parts. I am following the basic color scheme of the standard GM Sniper 2. Light blue appendages with the dark blue chest, skirts, and accent areas. Since I’m using a digital camo pattern for the majority of the kit, the base paint for the lighter blue vs the darker blue needs to be different for those specific parts. I work in the inverse of colors. The light color parts are based coated in Finisher’s wolf blue. The dark blue areas are based coated in a custom mix of Finisher’s lavender and pure white – to get a light lavender color. Starting with the skirts that will eventually be the darker blue. This light lavender color is used as the base coat. When the first base coat cures, the first squares are placed.
I didn’t want to just do a straight digi-camo pattern. Mike Wine had did some net masking on his Sinanju Stein that I thought was really cool and I wanted to try this too. It is a HUGE pain in the ass. But the general idea is to lay down the “net” color. Use the mesh as a masking tool and lay down the main color. So with the skirts’ first layer masked, Mr Color grayish bluey #337 is laid over everything first. Once that cured. Some fabric mesh I picked up at the local fabric store is held over the parts and Finisher’s superfine cobalt is sprayed. This leaves the part with a grey mesh pattern.
Once the above cures, we move on to the next level of masking. Masking off the meshed cobalt layer. Learning from my spoon experiment, I applied more masking keeping the unmasked areas a little tighter between the squares. It is a little interesting to have to think in reverse when doing this kind of masking. But once masked off, the parts are sprayed with Finisher’s wolf blue. Allowing the wolf blue to cure, the mask is removed and I took a quick picture and posted this on a few sites. This was over a week ago and I didn’t get back to work on the kit until I got back from Ecuador last Friday.
So back to the grind this past weekend. I took the skirts apart and started painting the internal frame, the detail bits, and the base part where the cut up outer skirts attach. The rather busy paint scheme hides the amount of detail work, but it’s still not complete, so as this progresses, everything should look better. I hope.
The arms will be the lighter lavender color so the base coat for those starts with the wolf blue and masking for the first layer. Then the whole part is sprayed grey and the Mike Wine net masking is applied followed by the next layer of masking. The final color is the light lavender tone and once unmasked, another layer of masking is done to paint the detail plastic strip that was added in alclad burnt iron. I think there is a little too much negative space around the strip detail, so I will need to go back and spray the darker tones to better balance the scheme.
While the above was happening, the internals and what I like to call the framing pieces for the paint scheme are painted. Again, I did not want to digitally camo the whole kit. I wanted to have breaks between areas; so these frame areas are painted with the solid colors. For these parts, I used a different mix. I used finisher’s pure white with a touch of superfine cobalt to give it a tint of blue. This light framing color will help break up the rather busy camo pattern with a solid color. In the previous skirt pictures, this is the same light blue used on the inner armor piece. The internal details are painted with alclad magnesium, polished aluminum, and polished brass.
The knife is painted with alclad colors. I painted the hilt with a base coat of the framing light blue color then sprayed finisher’s pearl white over to get a pearled effect. Pictures here do no justice and it’s hard to see the pearl effect. But it is a small part and will be at the back, so unless looking really closely at different angles, it will be hard to see in person too.
Returning to the earlier statement that the Mike Wine net masking technique is difficult. I ended up screwing it up while painting the rear skirts. So the only thing to do is to sand this down and start over.
The main body work started a few days ago with the masking over the base light lavender tone. The main chest piece doesn’t work well with the net masking technique so I decided to forego that for this piece as well as the backpack. The shoulders and legs will still get that net treatment. I’m not sure how this will eventually match up when I’m all said and done, but I decided on this for the interest of the deadline I’ve set for myself. Instead, I added some striping that cuts diagonally down the right side of the chest.
Mask, paint, mask, and the final wolf blue is sprayed then the masking is removed and the inner torso piece is added back. Notice that the inner torso piece is painted the same framing light blue as the arms. Again, using this as a means to break up the camo pattern. This is the same color as the inner piece to the skirts. Things are starting to come together.
The rest of the parts are in the various stages of paint. Being out of county for a week really puts the drive back into working on the damn thing. Unfortunately, my work has a bunch of trips lined up and Those Gundam Guys in general have a bunch of events coming up that will severely impact progress. Short cuts cause fuck ups as does rushing, so I need to constantly remind myself to slow the F down when I do get time to work on this.
It’s the end of the post which means it’s time for the
shameless plugging of our newest TGG Kamfper Shirts!
Mediums are now in stock!!!


