September 10, 2006: Started working on this little diorama last night beginning with the base; why, because I don't have the main kit for this little dio/vignette. The idea here is to have a destroyed RX-78-NT-1 half buried in the sand with a unspecified MG kit standing over the poor bastard. This MG NT-1 was probably the very first MG I ever buit... oh about 6-7 years ago. The first couple of pictures show the original paint and panel lines. I used this as a test bed for the final pose and position of the kit.


Following this, I built up a styrofoam base around the NT-1 that will be half buried. I had the waists and thighs in to keep the correct aspects of length and such. I removed most of what will be completely burried. I also replaced the original NT-1 ugly fat foot with Ako Hobby's Ka style foot. Funny since the other foot went to the one legged vet, it's fitting that the left over foot from the set goes to this kit.


I put the parts into a purple power bath to remove all the original paints, and after about 10 hours of soaking, I remove the pieces, and took a toothbrush and brushed off all the old paint. Then went to gluing and fixing some of the seams. Since this was my first MG kit... apparently I was a bit over zealous when it came to removing the parts from the trees - I had cut too deeply and there are dents where the some of the parts originally attached to the trees. Using some Tamiya extra thin cement in a paint tin and scrapping bits of plastic from left over trees, I made "plastic putty" that I then applied to the various seam areas.


September 13, 2006: I've been building for the past couple of days hence the lack of an update. After snapping the Kampfer together and test standing it on the above base, I came to the realization that the first incarnation of the base was entirely too small. I had to go bigger. So I increased the base size with some more styrofoam and plaster cloth. Now on to the actual Kampfer build.


Mods so far are a couple of scratch built gatling guns. I decided to use a three barrel design instead of a six or 5 barrel; since I'm creating two, I don't want to have too much weight thrown onto the backpack of the Kampfer... after all, this isn't Wing. I also replaced the two main backpack thrusters with propellant tanks. I figured that a desert themed Kampfer would require more fuel for operations in the desert. The shoulder thrusters have also been closed up. In the right forearm, I built in a dual beam saber housing - so I will be closing up the in leg beam saber holders. And the last thing I did so far was to create a mine layer/shield/panzerfaust assembly. Yeah, I know it's rather idiotic to have mines sitting on top of a shield, but the shield is secondary, once the mines and panzerfausts are used, the Kampfer can use the remaining part as a shield or just discard it. That's my story, and I'm sticking to it. I also have a ton of cosmetic mods that I have planned, so there's still tons of work left before the sucker's ready for primer. I see tons of epoxy putty in this guy's near future.


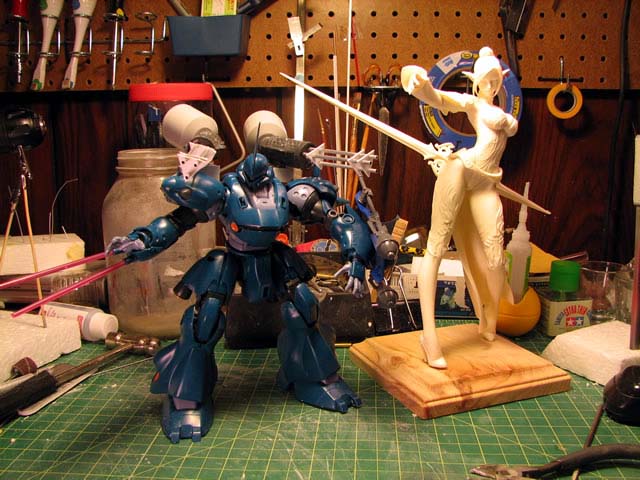
The Cerberus Project Dark Elf came in the mail today... so granted I'll still try to work on the Kampfer here and there, but the main focus for now will be on the Drow chick.
October 1, 2006: Ok, got back into the groove of working on this kit. Nothing like the smell of freshly mixed tamiya epoxy putty quick type to get the juices flowing. Using the stuff to fill in a few rather big gaps in both the kit and some scratch built parts like the gatling gun pivot pieces and the original saber holder holes in the thighs. Extending the left shoulder spikes.


Adding some styrene as the basic support for the epoxy putty to the shield/mine + panzerfaust holder. Cut the curved spikes off an MG Gouf, and added those to the front of the shield.


Continued work on the base. Using some stuffed called sculptamold (similar stuff to celluclay, but with the claim that it does not shrink - well see tomorrow) I filled in some of the gaps between the MG Alex and the base as well as evened out the overall base.


Using some styrofoam as structural support placed inside the outer leg thrusters, I then placed epoxy putty over the styrofoam and effectively filled the leg thrusters. Next I filled in the antennae hole and head vulcan ports using epoxy putty. Also going to push the forehead piece a little forward using some styrene. Tomorrow, the sanding fun begins....


October 2, 2006: Continued work. I get some of my ideas at night while I
lay down to sleep. So last night, I thought to add some magnets and allow
the mines to actually be magentic mines and have them removable from the
shield. Also concocted last night was to move the shotgun holder to the
leg.... still debating if I should add a second shot gun holder to the other
leg. Just worried that it may look a little too busy.


The rest of the night was spent doing rough sanding. I will probably not completely sand shiny smooth since I'm planning on adding the cast iron effect to the body of the kampfer. But here's what the head looks like so far as well as the close up leg vents.


October 4, 2006 As the week progresses, the build continues. I replaced the upper and lower torso vents with mesh covers. The to have the shot gun holster thingy fit better, I sliced off the side thigh thrusters, and all the while I've been working on sanding down everything and preparing the kit for the spongy primer session.


October 11, 2006: Ok, not much of an update for a couple of reasons. First
and foremost, my cpu died on me last week which prompted me to spend the
majority of two days rebuilding the computer and reinstalling everything.
Second was that I needed to help out family members with some accounting
issues. So only a very small amount of work done for the update. The mono-eye
has been modified:


I redid the gunbarrels for the gats, added some tubing to the main gun parts, and filled in some of the holes and gaps with epoxy putty.


Next I drilled the holes of the back covers enlarging the vent holes then adding meshing to the internals. The last pictures is still in the building process. I have figured out what I want to add to the other knee weapon attachment point... the Gouf Custom's Sword. Going to add a little detail to the hilt thingy.


October 13, 2006 Ok, little update before I get to laying down paint colors. Got all the sanding down so all the parts were ready for primer. The exterior armor (original blue parts) had the cast iron effect applied. After sponging on Mr Surfacer 500, I sprayed on a primer layer of Mr Surfacer 500 over the armor pieces. The joint and non armor pieces were primed with Mr Surfacer 1000. There's a noticable different between the two primed finishes.


After having everything dry, I did a quick assembly to take a look at how the kit looks and find areas to fix. I need to fix a few areas that I didn't sand too well. The great thing about applying primer is that little imperfections show up in the nice little gray tone. When I wake up tomorrow, I'll just wet sand the parts to remove any dust or overly rough areas and then start painting the colors.


October 14, 2006: After a full day of painting, this is about as far as I got. Guess it'll won't make it to OrangeCon this year. Well at least I got this far. Still have the rest of the weapons to paint and still have alot of work on the sucker.


October 18, 2006: Ok, back to work on the Kampfer. Did the decaling tonight. Letting thing cure overnight I can get to the wash and filter.


October 19, 2006: Weathering update. First thing done tonight was to take the hobby knife and chip away at the decals. Once that was done, I sprayed on a coat of Mr Super Clear gloss. I did this to proctect the decals from the next step which involved enamels. A past experience with enamel thinner dissolving decal inks taught me to clear coat the decals before moving on. Once the clear was dried, I went and did a fade. Using enamel paints, I dabbed colors all over the parts, then went over them with a rough brush dipped in enamel thinner and just brushed in a downward motion. This fades the paint with highlights of the colors I used. I also get some cool rain streaks. I have a few pictures that compare the tones before and after. I still have to flat coat and do the pastel weathering before I can say she's done.


October 22, 2006:


August 18, 2007: Today we had a model building gathering at my house and since next week is the Nationals competition, I wanted to work on something to enter as a diorama. I started working on a new dio using 4 of the Mechanical Chain Bases from Kotobukia, and after building for a decent amount of time, I came to the realization that I would never finish what I want to accomplish in 5 or so days. So to the back burner that idea was flung. Looking around my room at the numerous half started projects, my eyes fell back on the poor little Alex half enbeded in styrofoam and paper mache. Ok, decision time. I am pretty sure that I can pump this sucker out and have time to add touchups to other kits I plan on bringing out to the Nationals.
Work began with the good ole solvent glue texture + toothbrush technique.
It's a very quick and clean way to add texture. Sanded everything down and
then because it was model build night, I had four other friends over building
various projects. Throwing the idea ball around, some suggested to
"break Alex's fingers", another suggest having a huge heat hawk axe protruding
from poor Alex's chest. Hell, we even came up with a name for the damn diorama
while I was goofing off with the Kampfer's poses while standing over the
poor Alex. More on that later; and on with the pictures.


Once all the parts were sanded down after the solvent glue treatment, I went in and sprayed on the primer. For the base, I used a spray can of sand brown and just sprayed the entire surface. I then took some Mr Surfacer 1000 and primed all the individual parts of the Alex, then went in and carefully primed the embedded Alex.


What is a build gathering without some goofing off with other people's completed models. You can see gtetra with his VERY customized Gaplant in the making. And Sean with his ships. I don't know how he keeps sane with all that photo etch. Asuka's Eva unit that is mooning my poor Zaku was built by Sean. At the current angle, you cannot see that Mr Zaku is slowly reaching for his Bazooka... It was an great turnout, I forgot to snap a few pictures of Bobby and David working on their resin figure kits; next time. Lots of fun and we actually got a decent amount of work completed.


Augut 19, 2007: I painted the Alex, gloss coated her, decaled, and final gloss coat to seal in the decals. Next up will be the weathering phase


August 20, 2007: Applied the filter and flat coat.


Applying a mixture of glue and future floor polish as an adhesive medium, I shifted dirt onto the dio. Then added a few rocks and some yellow grass


Doing a quick test fit for the kampfer. I still have the pastel weathering and other touchups before the little dio is completed.


The project has been completed: Completed page.
October 22, 2006: Little update the the Kampfer. I got a good amount of weathering done on it. Added some paint chipping, weathered the decals, added some pigments and a couple of coats of Mr Super Clear Flat has gotten the sucker pretty dusty looking. I still have to work on painting the shield, but as you can see in the background, some bunny girls have my attention right now :)
August 26, 2007: Completed the base: Click here for the completed page.